For me, burgers aren’t just about eating out with friends (although this is definitely a good reason to write a blog about a delicious food-type, right?!). It’s also about cooking them at home too – after all, burgers are life!
Home-Made Smashies
The smash-pattie style of cooking burgers was first brought to the masses in the Great Lakes area of the US, and then popularised by Rick Schaden and Tom Ryan who founded the Smashburger chain of restaurants. Here we show you how to make your own at home……
Ingredients:-
Beef chuck*
Sirloin Steak*
Ribeye Steak*
Mature Cheddar cheese
Gouda cheese
Smoked streaky bacon
Burger buns
Your favourite sauces
*the meat blend that goes in to the grind is a 3-2-1 ratio eg 300g chuck, 200g Sirloin, 100g Ribeye. Adjust to make as much as you like!
Before you start……
The key to a great burger (and pretty much everything in life) is all down to the quality of the ingredients that you use. Use the best quality that you can afford, and if possible support your local shops….
In this guide I will show you the blend that I mince together to get the flavour and texture that I like. If you don’t have access to a mincer most butchers will mince your meat for you.
The Grind….. (if you are not mincing yourself skip these next few steps)
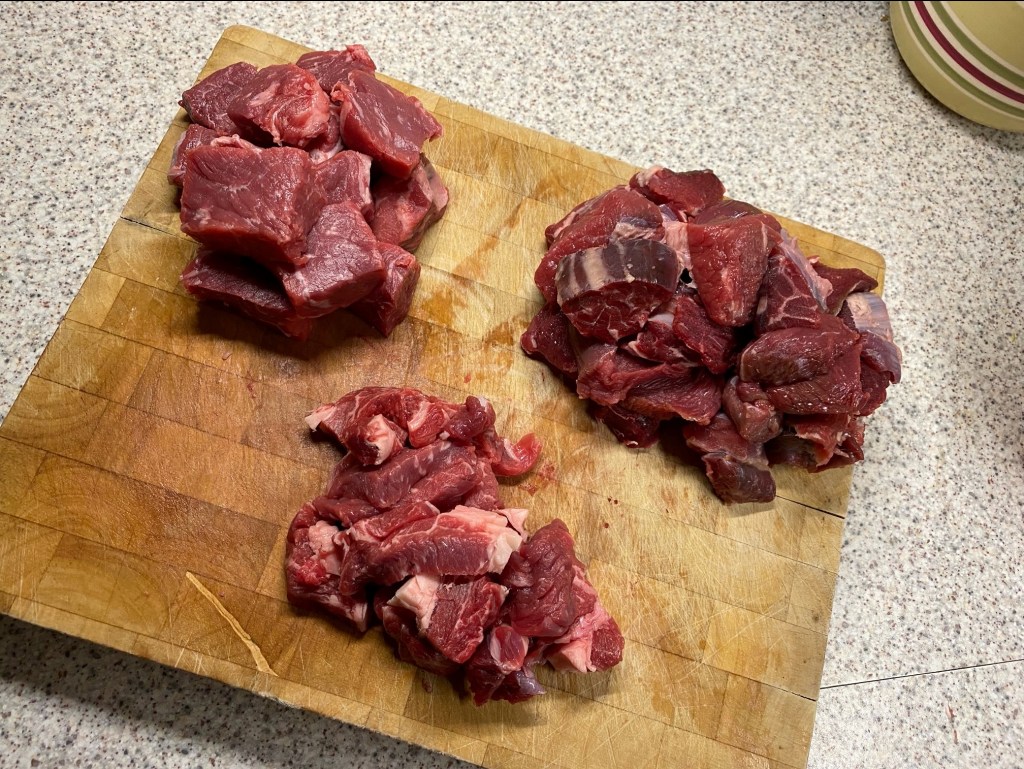
Using the 3-2-1 ratio of chuck to sirloin to ribeye helps the burger to have enough fat to bind without needing to add any additional ingredients, and produces a good texture. I recommend buying the meat as a steak, and cubing it yourself. This allows you to remove excess fat and trim any silverskin. Remember – fat is flavour so don’t remove it all!
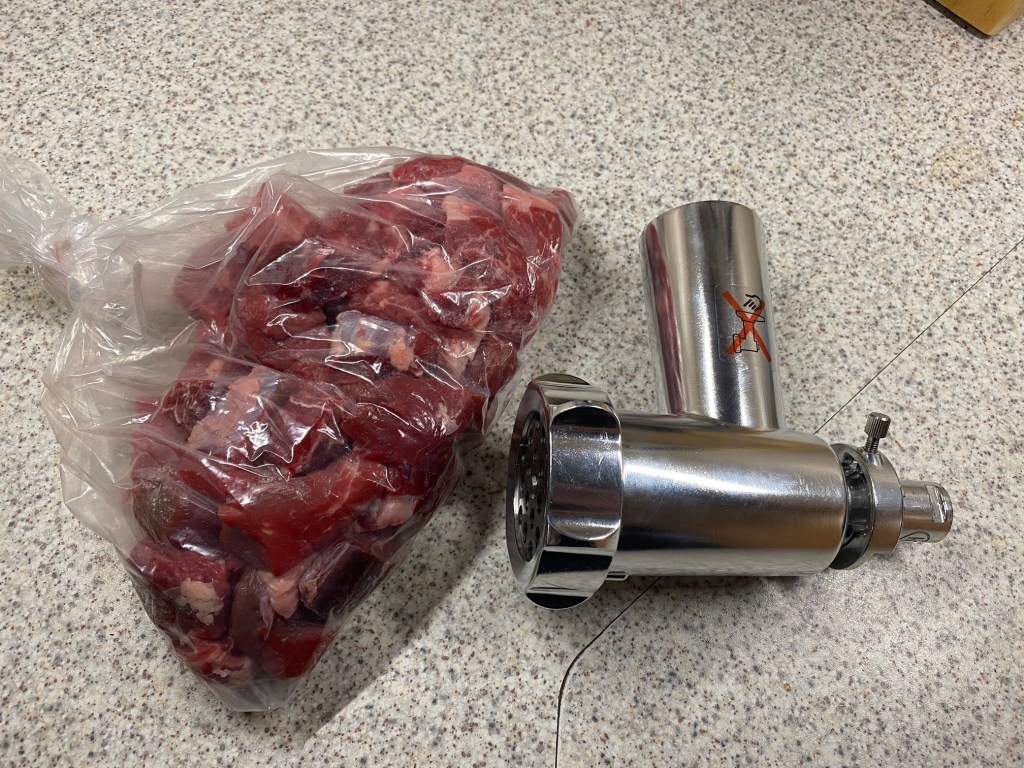
Once you have cubed your meat up – mix all three meats in to a freezer bag well, and pop it in the freezer with your mincer attachment for at least 30 minutes. This will stiffen the meat (but not freeze it through – check after 20 minutes to make sure its not solid!) and improve the texture even further. Freezing the mincer attachment increases the time that it retains it integrity.

Now that your meat is stiffened (steady now!) its time to get mincing. The trick here is to handle it as little as possible. Get your mincer prepped and ready, and on the slowest setting that it will run at. Add the meat cubes and press through, gently but firmly making sure that it is not clogging the die. One you have passed all the cubed meat through, give the mince blend a mix up in the bowl. Pass the whole lot through the mincer two more time, using the same die and mixing in between passes. Passing the meat through 3 times helps to distribute the different cuts of meat evenly and ensures that any silverskin that you might have missed if broken up – this will avoid any gristly bits!
Once you have your basic burger meat blend, you can safely store in the fridge for a day or so. This is super convenient if you are cooking for guests, as you can prep the day before giving you more time for entertaining….
Balls. Meaty Balls……

Thermal shock can ruin a good slice of cow, so it makes good sense to plan ahead and get your steaks out of the fridge 30 minutes before you cook it. Burger meat is no different, so grab that sucker out.
This is a great time to portion out your burgers. The ideal weight that I have found that works in my pan (as a home cook I’m not using a hot-plate) is 120g per ball. This is slightly more than 1/4lb, and creates a good sized patty when smashed. The burger meat needs to be gently rolled together. They should form loose balls – and it’s VERY important that you don’t overly work them. The texture of the mince is a key component of the overall cook.
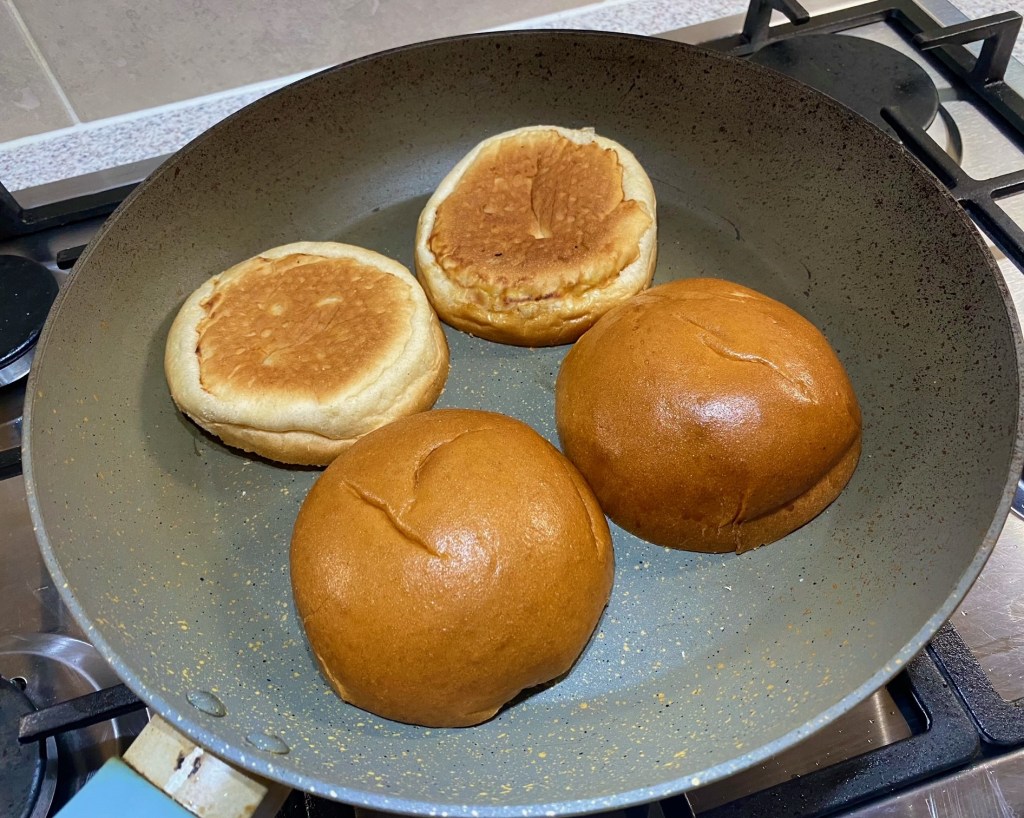
Once I have weighed and balled the grind, pop them to one side loosely covered (to stop them pesky flies from getting on them!) to come up to room temp. Whilst they are getting ready, now is the time to grill your bacon and toast your buns ready.
Get Prepped……
The beauty of the smash burger is the speed at which it all comes together. It also means that you need to be prepared before you start to cook them.
I find it useful to have all of my components lined up and ready to go – that way you can concentrate on the important bits.
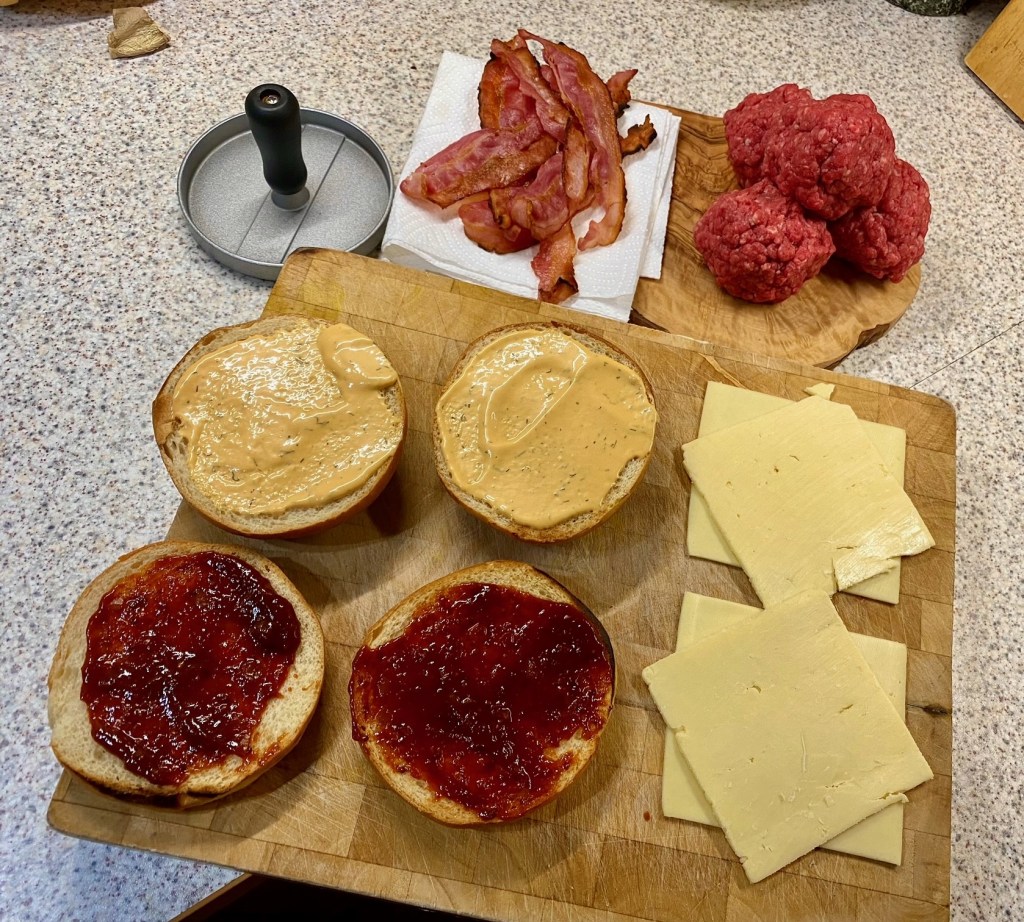
cheese stacks ready to go on the patties.
Get Cookin’!
Once you have all of your gear together, it’s time to get to the cooking.
Using the same pan that you toasted your buns in, add a drizzle of vegetable oil to the pan and get it good and hot. The meat balls need to sizzle as they are placed in the pan, as this is what creates that all important flavour and texture.
The balls are placed directly in to the pan, and seasoned to taste across the top. As mentioned above they should be sizzling straight away, so you don’t want to dilly-dally here.
Using something flat (I use the top of a burger press), press the balls flat into the hot pan until they are approx. 8.5 – 10mm thick. I like to then cross the pattern in to the top of the patty that my burger press makes.
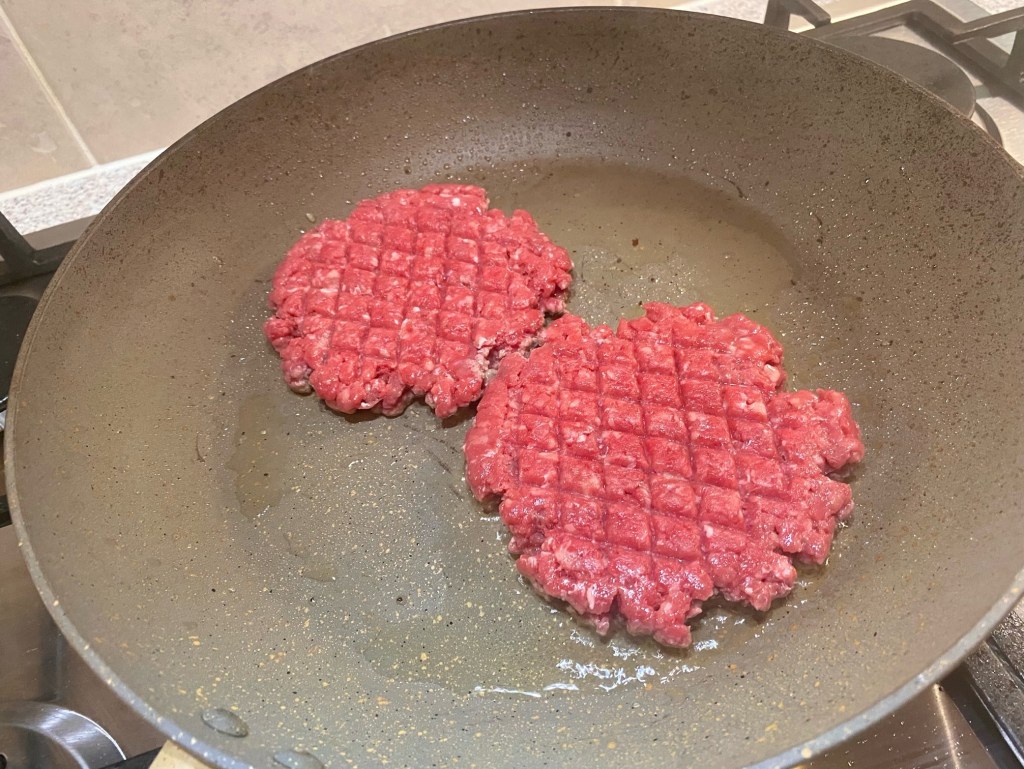
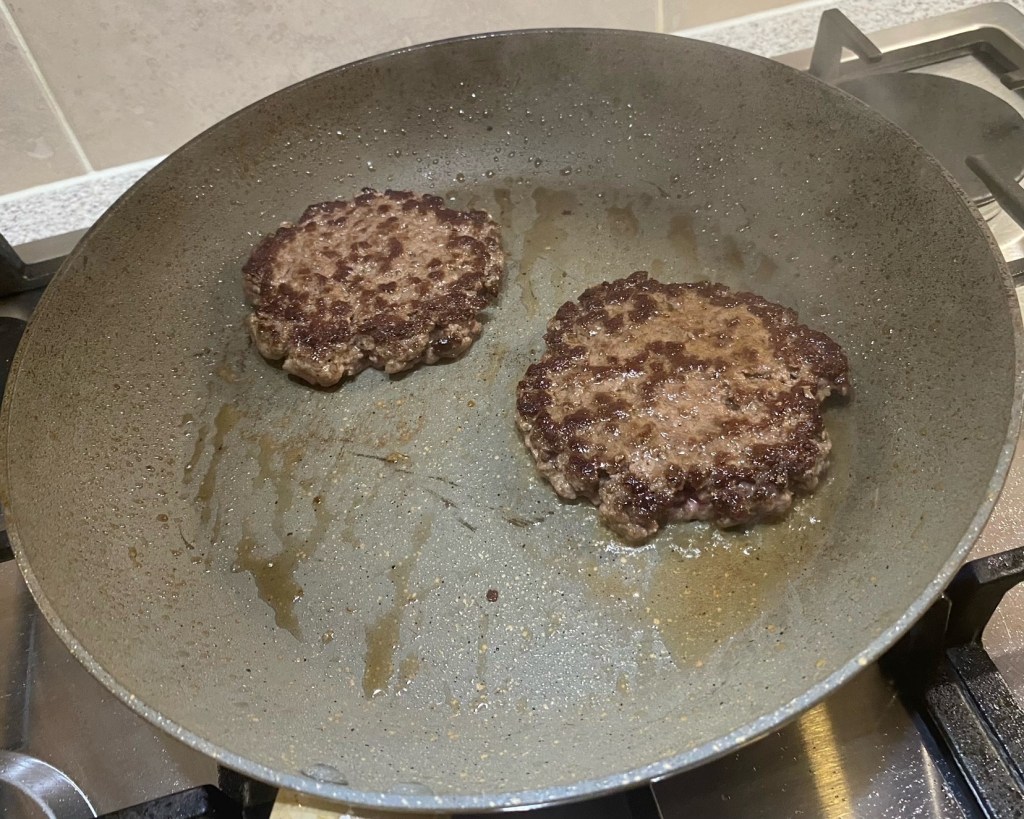
There are 2 reasons why this method is so good – the first is the speed at which they cook at – you can go from balls to burgers in just a few minutes. The second reason is that the process of smashing the balls in to the hot pan creates a crust on the bottom of the burger, which in turn seals in the flavour.
Once you start to see juices coming to the top of the burger, its time to flip. Use a spatula to flip the burgers over.
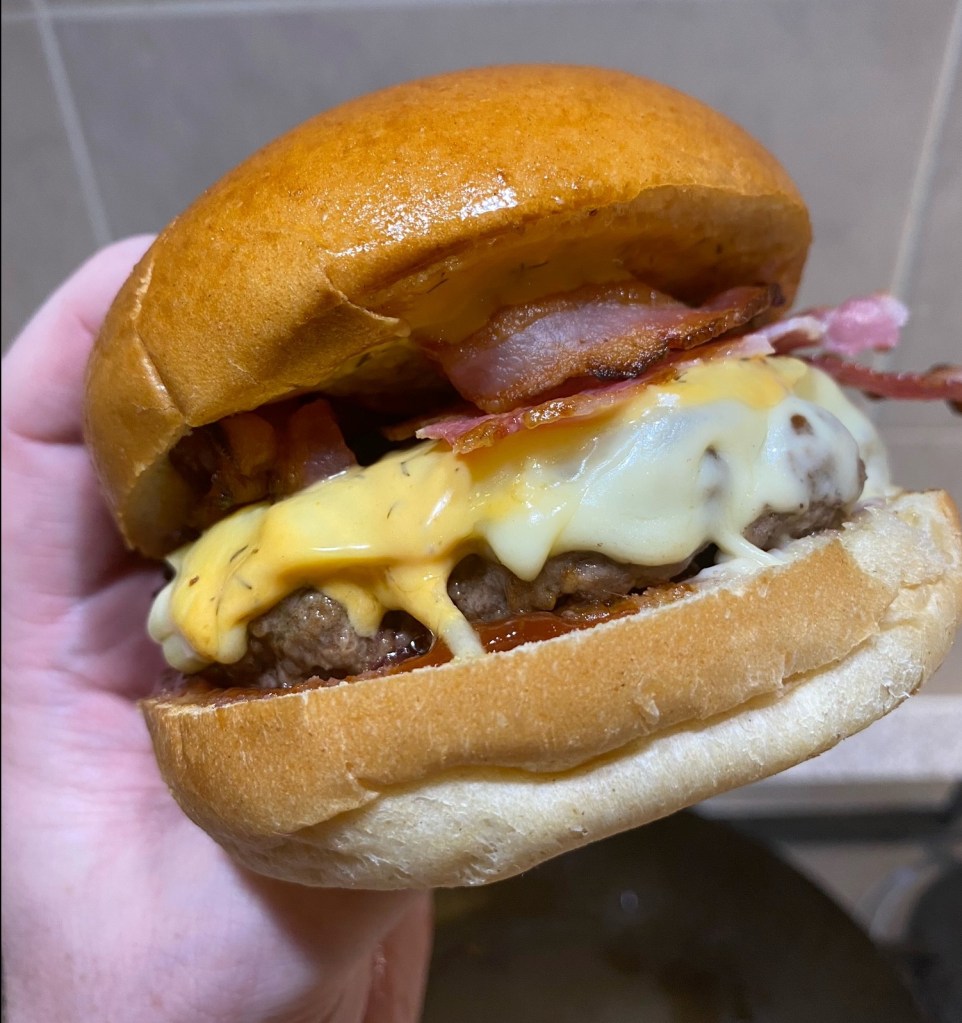
Give the patties another minute, and then top them with your prepared cheese stack. If you are using different cheeses (my go to stack is mature cheddar and gouda) ensure that the harder cheese is in contact with the burger. These tend to melt slower than softer cheese and then top with your bun lids. If you are planning on adding bacon, place this on the cheese before you top them.

The next bit might seem odd – but trust me here – this next step will transform a good burger into an AMAZING burger…..
Once you have added your cheese (and bacon) top the patties with your bun lids. Add a drop of water to the pan in between your topped burgers and cover the whole thing up. Adding water at this stage, with the pan as hot as it is will cause the water to turn to steam almost immediately. By adding a lid quickly after you have dropped the water in you effectively steam the bun and increase the moisture in the air. This immediately softens the bun, and helps the cheese to melt.
Give them 30 seconds in the steam, and then whip off the lid. If you are lucky enough to have a center console, and you’re cooking these for friends I usually find a ‘Ta-Daa!’ appropriate at this stage (although not essential).

All that is left to do now is to scoop those beauties up and slap them on to your bun bottoms and serve up to friends, or to just simply enjoy to yourself!
————————————————————————————————–
Berry’s BANGIN Buttermilk Chicken


Buttermilk chicken is always a winner and delicious, this is a real crowd pleaser. As good between bread as it is with a dip. You could almost say it’s good enough to make you want to lick your fingers after eating it….here’s my take on this classic.
Ingredients:-
3 large chicken breasts
buttermilk marinade
284ml buttermilk (either with the cream, or milk in your favourite supermarket)
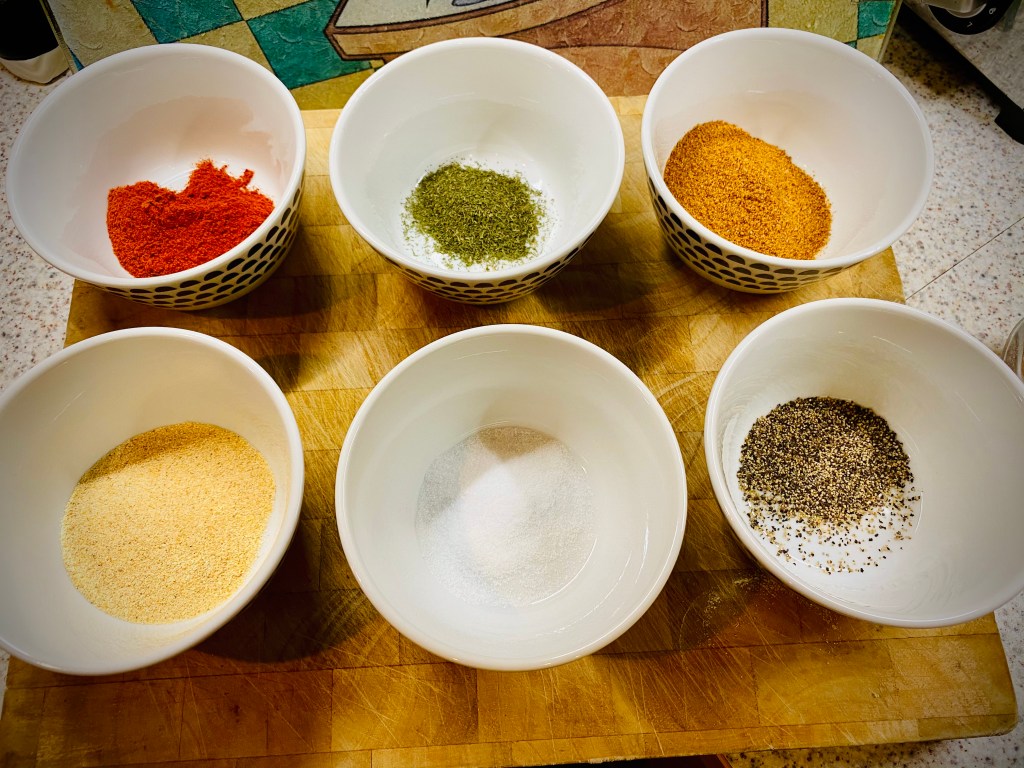
2 tbs Caribbean spice mix
1 tbs garlic powder
1 tbs dried dill
1 tsp salt
1 tsp pepper
1 tbs paprika
Batter Mix
1 cup of plain flour
1tsp salt
2tsp black pepper
2tsp Aromat (optional)
Method:-
Prep your chicken
I have always believed that not all chicken is equal. Now, it is possible to make delicious food with cheap meats. Chicken is definitely one of them, but I firmly believe that good chicken is worth the extra money if you can afford it.
Select your chicken breasts with care, you will want to limit the amount of fat that will need to be trimmed off later.
Some breasts will come with a small knot of cartilage that you will want to remove as it’s pretty horrible to chomp into.
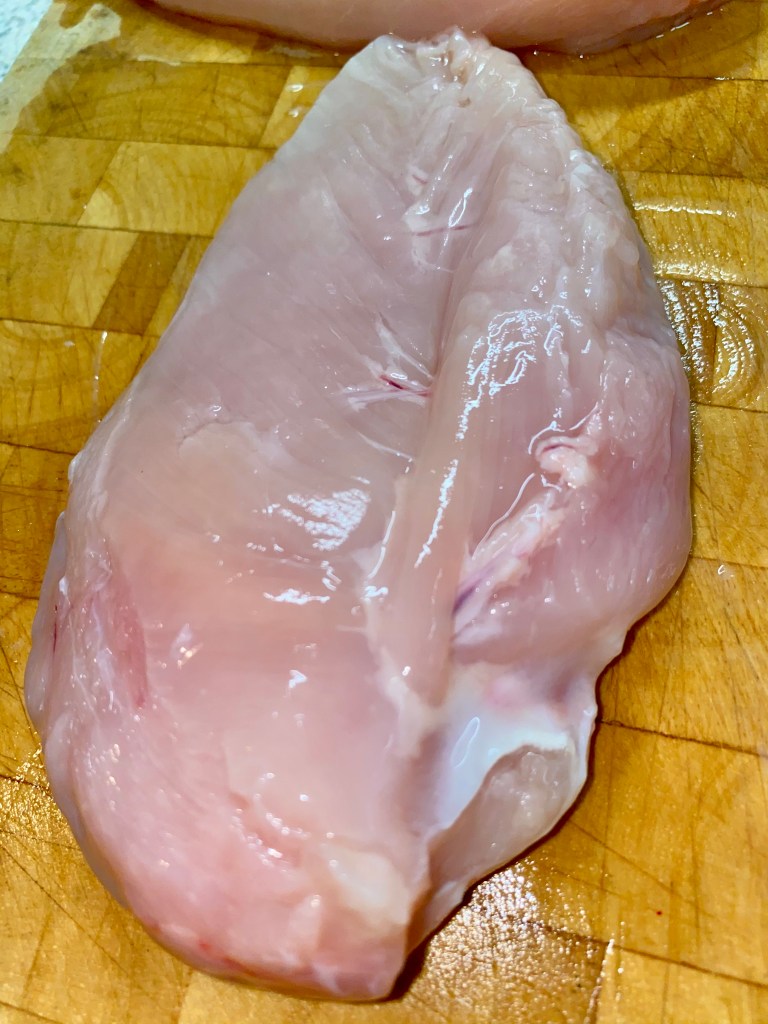
Once you have trimmed away any other nasties, you have a choice to make. The meat needs to be relatively uniform in its thickness so that it cooks evenly. I like to butterfly mine, starting from the thick side of the breast to the thinner end. Don’t cut all the way through!

If you’re not comfortable with butterflying the breast you can flatten it by putting it into a freezer bag and bashing it with a rolling pin until it’s of even thickness. Either technique works so it’s down to your preference.
Prep the buttermilk marinade
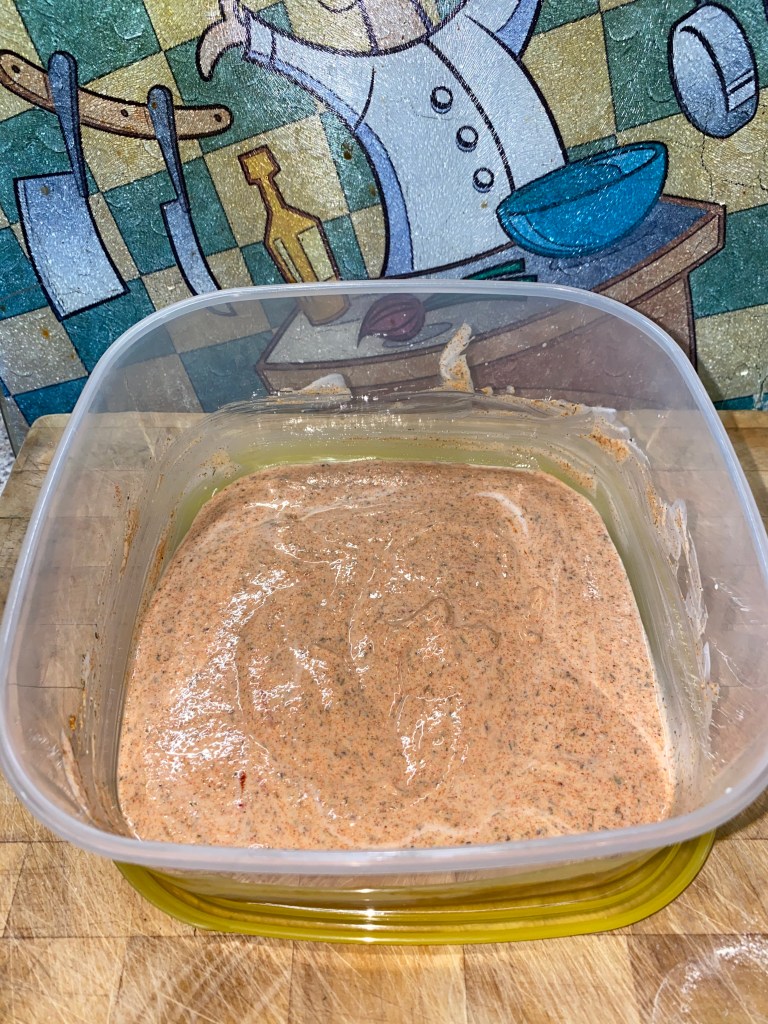
Once you have prepped your meat it’s time to mix up your buttermilk marinade. There isn’t a specific way to do this, mix the spices into the buttermilk and make sure that it’s combined well. I do this in the tub I’m going to marinade my chicken in so I have less washing up to do later.
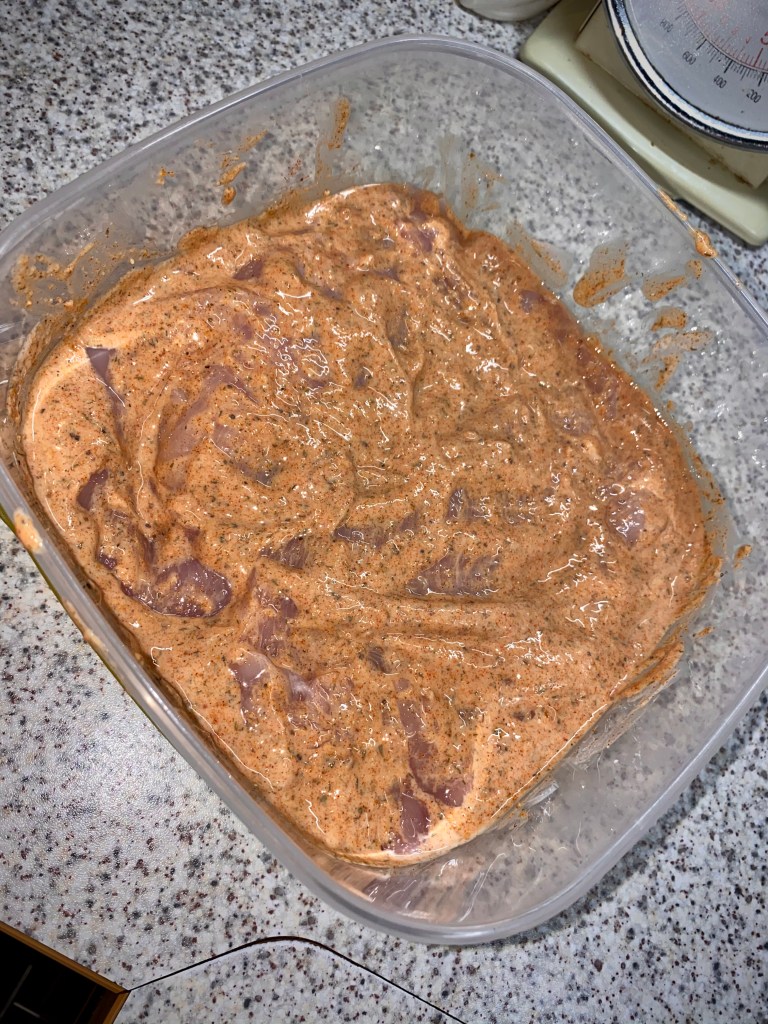
Once the marinade it mixed well. And there are no lumps of spice or streaks of unspiced buttermilk add your flattened chicken. You’re going to want to make sure that it is fully submersed in the mixture.
Seal the lid of your tub, and pop the lot into the fridge. Ideally you want to leave it for 12hrs to infuse with the flavours, but I have left it for 6 hours and noticed only a slight reduction in resulting flavours.
Once you have marinaded your chicken you’re going to want to get your oil ready. I usually deep fry mine in a dedicated fryer, but you can do it on a stove top too, as long as you’re careful and have an appropriately sized pan. Heat the oil to 180° – and keep an eye on it and your surroundings. Oil at this temp will provide horrible burns, so be vigilant!
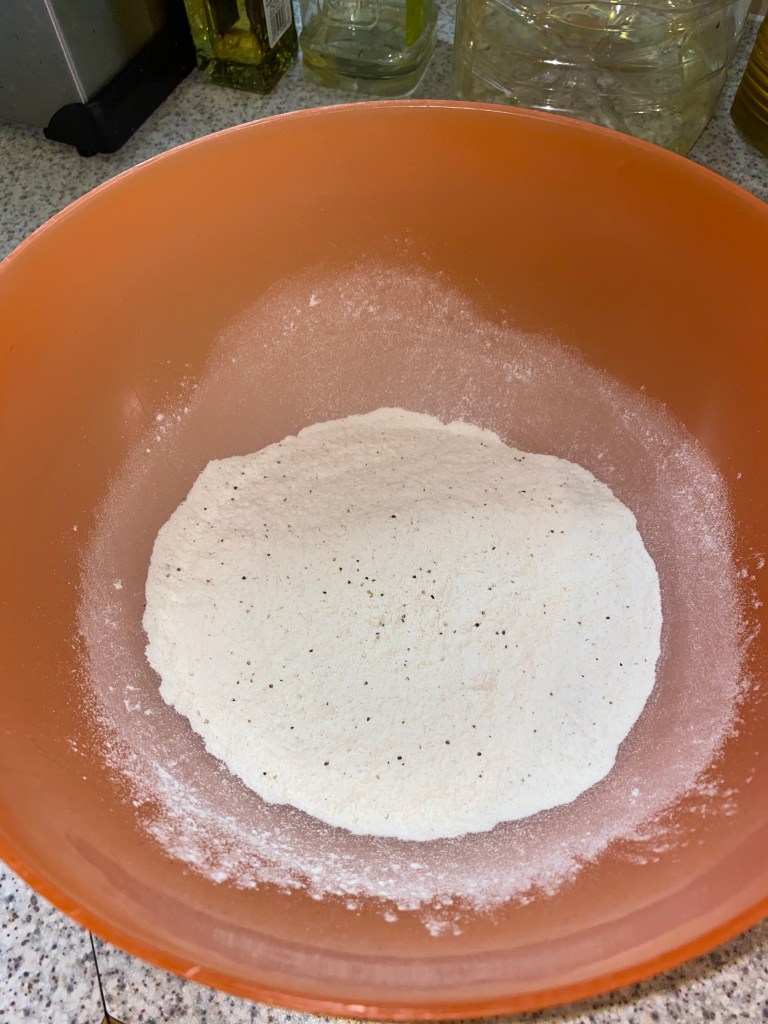
Whilst the oil is heating up, mix your coating ingredients together. This is essentially seasoned flour. I like my batter to be peppery, so I add salt and pepper to mine, as well as a tablespoon of Aromat (this is a dried seasoning from Knor which is very tasty!)
Once mixed well, start to coat your chicken. Don’t remove any buttermilk mix mix from the meat, as this is what binds the coating to the breast. Carefully coat with the seasoned flour evenly over the whole breast, and try not to scrape any off whilst handling. Place on a wire rack to ‘wet through’.

Allowing the flour and buttermilk mix to combine is what gives the chicken its crunchy outside and moist middle. The trick here is to allow the flour to wet through with the mixture before you deep fry it.
I prefer my chicken to be extra crispy, so I will allow the flour to wet through, and then I will put the chicken back into the buttermilk mix and add another layer of flour, doubling up.
Once this second layer of flour has wetted, it’s ready to get into the oil.

Ensure that your oil is up to temp, and add your chicken one breast at a time. There is a method to stop what you are cooking from sticking to the basket at the bottom of the oil, and it’s as simple as just holding on to it and lowering it into the oil gently. This will allow the initial shell to develop before it drops to the bottom.
Depending on the thickness of your breasts will dictate how long it takes to cook. As a general rule of thumb I will flip the breast in the fryer at around the 4-5 minute mark. The underside tends to darken quicker in my fryer, and I’m looking for a uniformly golden colour over the whole surface. If it’s a particularly juicy morsel, I might leave it longer.
Once I believe that it’s done, I’ll pull the chicken out and use a stab probe to check the internal temperature. I aim for as close to 80° at the thickest part of the breast, and prove a couple of different spots to make sure.
if you don’t have a probe you can cut the breast in half and check to see if the inside is done all the way. If in doubt, pop it back in until you are satisfied that it’s properly cooked.

Once you are happy that your breast is cooked through, it’s time to start putting your burger together. As with all burgers, you can fill it with whatever you like. This chicken is as well suited to a caramelised pineapple as it is hot sauce and salad leaves.

Of course, this chicken doesn’t have to live in a burger, it’s just as good on its own or with dips. You decide on how you want it!

Let us know if you make this recipe, and if you liked it!
——————————————————————
Cheese filled Thai Style Turkey Burgers

A little time ago, before the world was locked down and summer BBQs were enjoyed by anyone with access to outside space and something to set on fire I created a low-fat, high protein burger for the guys at the gym, with flavour and a little kick. These soon morphed into a more traditional cheesy and delicious favourite….. read on below for the breakdown……

This mix can be scaled up or down, but quantities are based on 500g of raw meat.
Ingredients:-
500g Turkey thigh mince
2 chopped red chillis (if you like heat, choose hotter chillis, I find jalapeños perfect)
2 slices cheese per patty
8 grams freeze dried coriander
2 teaspoons ginger paste
2 teaspoons garlic paste
2 teaspoons lemongrass paste
2 teaspoons chilli paste
25g chopped salted peanuts (if you have a peanut allergy, these can be swapped out with onion salad crunchies for a similar texture and complimentary flavour
1 tablespoon Ketjap Manis (light soy sauce will substitute if you can find it)
1 tablespoon sweet chilli sauce
breadcrumbs
secret ingredient – 1 tablespoon fish sauce. This stuff stinks, but you don’t get that flavour in the food. It adds a depth that will make your burgers really pop.
Method:-
Add the turkey mince and dry ingredients (except the breadcrumbs) in a bowl and mix well. You’re looking to ensure that the ingredients are mixed thoroughly through the meat. I use a ‘squeeze and twist’ motion to start off, and use a kneading dough technique to ensure even spread once all is in the bowl.
Add in the wet ingredients and mix as you go.
If you feel that the mix is getting a little wet add some breadcrumbs. You need to only add enough to dry the mixture. Too much will make your burgers bready which isn’t pleasant, add a little at a time!

Once all of your ingredients are mixed, prep your cheese.
If you are unable to find cheese that is already round, use a cookie cutter or sharp knife (ask for supervision from a responsible adult if you aren’t one) and cut your cheese so that it’s approximately 1cm smaller than your press.

Pack your burger press to half way with your burger mix, and press the cheese into the top. I give it a push to make the edges of the mix rise to the be level with the cheese.
Add burger mix to the top of your press covering the cheese, making sure to pay attention to the edges to ensure they bind and finish with the top press.

If you’re used to making patties in a press, you may find this a slightly stickier mix than you are used to. Tap the press against the edges to loosen the burger and shake free, laying them out on a baking sheet as you go.
If you are making a few stacks at a time, separate the patties with baking paper to prevent them from becoming one big mess before you cook them.
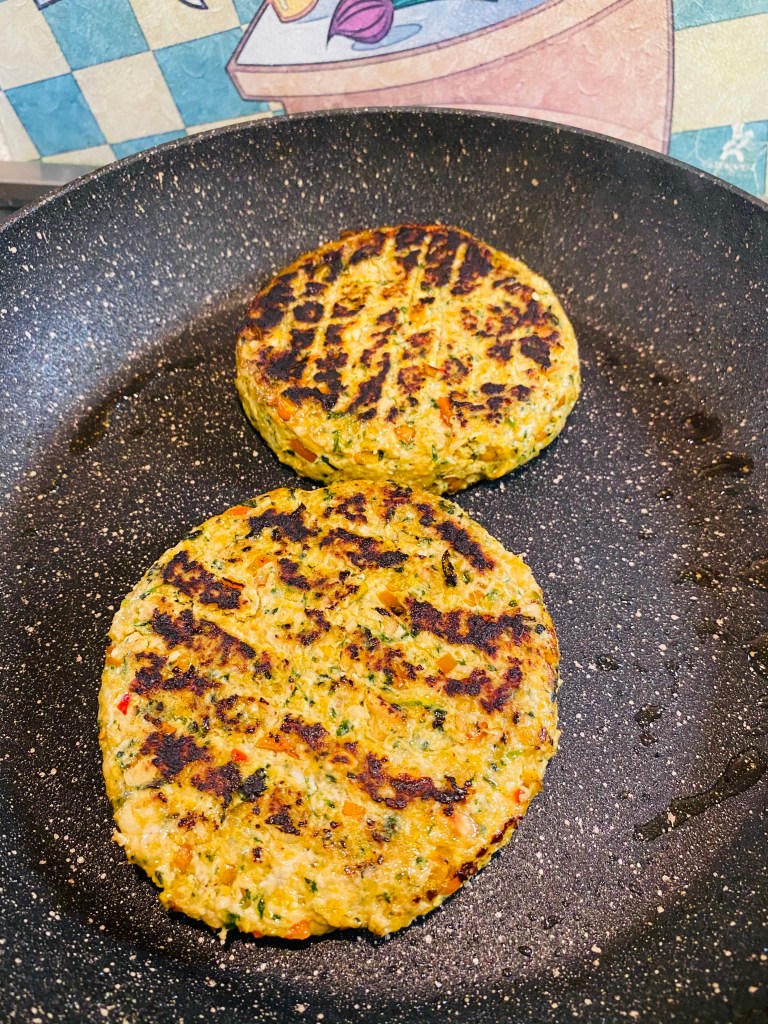
Use your favourite method to cook your burgers. Unlike with un-stuffed burgers these will remain moist due to the internal cheesy filling, so can be cooked low and slow or quickly on a BBQ.
You’ll need to be aware that they can be a little delicate to turn for exactly that reason, so tongs and a spatula are the order of the day.

Once cooked through, add to your favourite burger build – I like chilli jam on my bun for these ones, carrying the sweet and spicy theme along – but they are equally as good with additional cheese melted on top with a standard burger relish.

Give these a try for a different burger experience!
